Landing at Anzac Cove
The assault troops, mostly from the Australian and New Zealand Army Corps (ANZAC), landed at night on the western (Aegean Sea) side of the peninsula.
[nb 1] Not long after coming ashore, the ANZAC plans were discarded, and the companies and battalions were thrown into battle piecemeal and received mixed orders.
Three amphibious landings were planned to secure the Gallipoli Peninsula, which would allow the navy to attack the Turkish capital Constantinople, in the hope that would convince the Turks to ask for an armistice.
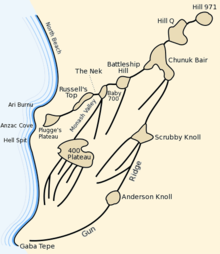
[13] The 3rd Australian Brigade, known as the covering force,[13] were to capture the third ridge from Battleship Hill south along the Sari Bair mountain range to Gaba Tepe.
The 26th Jacob's Mountain Battery[nb 2] from the British Indian Army would land next and then the 1st Australian Brigade, the division's reserve; all were to be ashore by 08:30.
On mobilisation each division had three infantry and one artillery regiment[18] for a total of around ten thousand men, or about half the size of the equivalent British formation.
[23] On 24 March, the Turks formed the Fifth Army, a force of over 100,000 men, in two corps of six divisions and a cavalry brigade, commanded by the German general Otto Liman von Sanders.
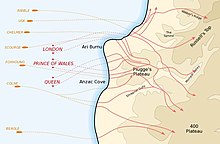
[28] The Royal Navy battleships Queen, Triumph, Prince of Wales, London, and Majestic, the cruiser Bacchante, seven destroyers and four transport ships led the way carrying the 3rd Brigade.
[29] At 01:00 on 25 April the British ships stopped at sea, and thirty-six rowing boats towed by twelve steamers embarked the first six companies, two each from the 9th, 10th and 11th battalions.
The plan was for them to cross the open ground and assault the first ridge line, but they were faced with a hill that came down almost to the water line, and there was confusion while the officers tried to work out their location, under small arms fire from the 8th Company,[nb 4] 2nd Battalion, 27th Infantry Regiment,[17][44] who had a platoon of between eighty and ninety men at Anzac Cove and a second platoon in the north around the Fisherman's Hut.
They also manned the Gaba Tepe strong-point, equipped with two obsolescent multi-barrelled Nordenfelt machine-guns, and several smaller posts in the south.
[45] Men from the 9th and 10th battalions started up the Ari Burnu slope, grabbing the gorse branches or digging their bayonets into the soil to provide leverage.
Kemal instead decided to go himself with the 57th Infantry Regiment and an artillery battery towards Chunuk Bair,[63] which he realised was the key point in the defence; whoever held those heights would dominate the battlefield.
[71] Arriving at Baby 700, Captain Eric Tulloch, 11th Battalion, decided to take his remaining sixty men towards Battleship Hill, leaving Lalor's company to dig in and defend The Nek.
[79] Private Victor Rupert Laidlaw (2nd Field Ambulance) gave this eyewitness account of the landing: 25 April No lights were allowed when we got up ...... we heard the big guns booming and in the distance we could see the battleships shelling the forts.
[59][83] Soon after, Lalor's company had been forced back to The Nek and the Turks were threatening to recapture Russell's Top, and at 10:15 Maclagen reported to Bridges his doubts over being able to hold out.
[99] Events ashore now forced a change in the disembarkation schedule, and at 17:50 orders were issued for the 4th Australian Brigade to start landing to boost the defence.
[102] MacLaurin's Hill is a 1,000 yard (910 m) long section of the Second Ridge that connects Baby 700 to 400 Plateau, with a steep slope on the ANZAC side down to Monash Valley.
[103] When Major James Denton's company of the 11th Battalion arrived at the hill they started digging in, and soon after received orders from MacLagen to hold the position at all costs.
The Turks did manage to remove the breech blocks, making the guns inoperable, so the Australians damaged the sights and internal screw mechanisms to put them out of action.
[113] Loutit, Lieutenant J. Haig of the 10th, and thirty-two men from the 9th, 10th, and 11th battalions crossed Legge Valley and climbed a spur of Gun Ridge, just to the south of Scrubby Knoll.
[122] When the 7th Battalion commander Lieutenant-Colonel Harold Elliott landed he realised events were not going to plan, and he headed to the 3rd Brigade headquarters to find out what was happening.
[137] The scattered formations managed to hold their positions for the remainder of the afternoon, then at 17:00 saw large numbers of Turkish troops coming over the southern section of Gun Ridge.
The artillery heralded the start of a Turkish counter-attack; columns of troops appeared over the top of Battleship Hill and on the flanks and attacked the ANZAC lines.
[141] At the same time the Australians and New Zealanders holding on at Baby 700 broke and ran back to an improvised line, from Walker's Ridge in the north to Pope's Hill in the south.
[150] Bridges in his divisional headquarters starting receiving messages from the front; just after 17:00 Lieutenant-Colonel George Braund on Walker's Ridge advised he was holding his position and "if reinforced could advance".
[154] At 14:25, Turkish artillery and small arms fire was so heavy that the Indian artillerymen were forced to push their guns back off the plateau by hand, and they reformed on the beach.
The second time he was informed there was only one uninvolved battalion left, the 4th, and Bridges was keeping them in reserve until more troops from the New Zealand and Australian Division had been landed.
[167] Unwilling to make that decision on his own, he signalled Hamilton; Both my divisional generals and brigadiers have represented to me that they fear their men are thoroughly demoralised by shrapnel fire to which they have been subjected all day after exhaustion and gallant work in morning.
In Turkey, large groups of Australians and New Zealanders have begun to gather at Anzac Cove, where in 2005 an estimated 20,000 people attended the service to commemorate the landings.