New Zealand Mounted Rifles Brigade
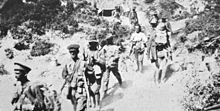
Its first active service was, in a dismounted role, during the Gallipoli Campaign, where they fought against the forces of the Ottoman Turkish Empire.
[nb 1] Seven months later, after the evacuation from Gallipoli, the brigade returned to Egypt, and in 1916, became part of the ANZAC Mounted Division.
Following its successful conclusion in 1918, the brigade played a small part in the Egyptian Revolution of 1919, before being disbanded in June 1919.
[1] His command comprised a headquarters, three regiments, each with three squadrons, and support troops, formed from the New Zealand Territorial Force,[5] The Territorial Force included a compulsory training system and the four New Zealand Military Districts were required to supply a mounted regiment for the NZEF.
[9] Then in the early stages of the Sinai Campaign the Australian 5th Light Horse Regiment, for a time, replaced the Wellington Mounted Rifles.
[11] In New Zealand, the brigade's reinforcements trained at Featherston Camp north east of Wellington where about 8,000 men were housed in nearly 300 buildings, including three billiard rooms, a post office, a cinema, sixteen dining halls, six cook-houses and stables for 500 horses.
[12] Once trained the men were sent to Sydney or Melbourne in Australia, where they embarked on Australian troopships bound for Suez.
[18] The brigade used their time training, which consisted of day and night marches through the desert, combined with rifle and machine-gun practice.
At daybreak they Turks started to retire to their own lines leaving thousands of dead behind, 500 of them in front of the Auckland's positions.
[29] The Canterbury Mounted Rifles defending in No.2 Post, then observed a Turkish force opposite Walker's Ridge, forming for another attack.
[30] The rest of the day was quiet, apart from both sides artillery, then on 20 May another Turkish attack began, but faltered in the face of the brigade's machine-gun fire and withdrew back to their own lines.
[34][35] Once secured the 6th Squadron Wellington Mounted Rifles, carrying spades and picks to improve the defences, moved in to occupy the position.
The squadron attempted to improve their defences, but thirty minutes later around 1,000 Turks had surrounded, and attacked the post and by 23:30 had cut the telephone wires to the rest of the brigade.
The dead ground to their front meant the defenders had to expose themselves on the trench parapet to open fire, which for a time kept the attackers at bay.
The initial part of the attack was to clear the Turks from the foothills, which was given to the New Zealand Mounted Rifles Brigade, reinforced by a Māori Pioneer Battalion.
[44] The attack began over the night of 5/6 August the Auckland Mounted Rifles successfully captured the Old No.3 Post.
[47] The next day the Auckland and Canterbury Mounted Rifles, the New Zealand Infantry Brigade and two British battalions, were combined as No.1 Column commanded by Brigadier-General Francis Earl Johnston.
All during the following day, the attacking Turks sky-lining themselves moving over the hill, becoming easy targets for the defenders, and were engaged with enfilade fire.
[48] Holding out until they were relived on 9 August, the brigade, which was understrength to start with, had virtually ceased to exist as a fighting unit.
[50] Two weeks later the Canterbury and Otago Mounted Rifles were selected to take part in the next battle to capture Hill 60.
At 15:30 21 August the battle began, the Canterbury Mounted Rifles charging straight at the hill suffered sixty percent casualties, among them their commanding officer.
The Wellington and Otago Mounted Rifles following up, passed beyond them and captured the Turkish reserve line.
On the other flanks the supporting assaults had failed, leaving the Wellington and Otago Mounted Rifles isolated on a narrow front.
[57] On 10 November the brigade returned to Gallipoli,[58] Moving back into the front line, they were not involved in any more assaults.
The last group of men having to cover for the whole brigade kept up a steady rate of fire and moved their machine-guns around the position to support the deception that all defences were fully manned.
[9] In January 1916, the brigade left Zeitoun and headed east camping that night beside the Great Bitter Lake on the Suez Canal.
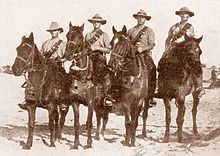
In February they carried out a dual role of manning trenches along the canal, dismounted, and doing long range mounted patrols into the Sinai.
[63] Without any notice at 20:30 23 April, the brigade was ordered to Kantara thirty-two miles (51 km) away on the Suez Canal.
The reason was not then known, but it later transpired a Turkish force in the Sinai Desert had attacked British yeomanry positions at Katia and Oghratina.