New Zealand and Australian Division
After the initial Allied assault at Anzac Cove, elements of the division were sent to Cape Helles in early May, where they participated in the Second Battle of Krithia, launching an unsuccessful attack towards the Achi Baba peak.
Later that month, the division helped repel an Ottoman counter-attack at Anzac Cove, after which it occupied the line until August, when the Allies launched an offensive designed to break the deadlock.
These efforts failed, and as winter set in on the peninsula, the division was evacuated from Gallipoli in mid-December 1915 as part of a general Allied withdrawal.
[12] On 2 February, after the Ottomans launched a raid on the Suez Canal, elements of the brigade took part in repelling the attack, with the Canterbury Battalion suffering the division's first losses in battle, with two men being wounded, one of whom later died.
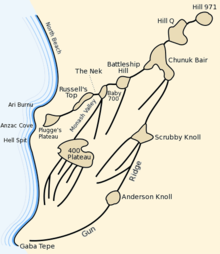
Tasked with extending the Allied line to the left of the Australian 3rd Brigade to the north of the landing beach, they were directed towards Walker's Ridge, advancing by way of Shrapnel and Monash Valley.
[18][19] Baby 700 was subsequently lost,[20] and in the aftermath the New Zealanders took up positions along Walker's Ridge, which formed the extreme left flank of the landing area, reinforcing the Australians around Russell's Top.
As they arrived, they were sent to fill the gap between the left and right flanks of the Anzac perimeter, which required holding positions across the head of Monash Valley.
[29] Throughout the remainder of the week, the Allied troops continued to consolidate their positions around Anzac Cove, digging in and establishing lines of communication and supply.
The Ottoman troops continued to hold the high ground, and the Anzac positions remained under observation and fire from snipers and machine guns.
[33] In the second week after the landing, efforts were made to straighten the Allied line, to prevent a salient from forming between Pope's Hill and Quinn's Post.
Godley was ordered to recapture Baby 700,[34] which was considered a key feature of the northern perimeter, allowing the Ottoman troops observation and fields of fire down important Allied avenues of approach.
[36] Under Colonel Francis Johnston, who had been ill during the landing and had temporarily deferred his command to Walker,[37] the New Zealand Infantry Brigade was tasked with assaulting the western aspect of Baby 700, while the Australians rushed the southern slope.
As a result, New Zealand engineers worked to build sandbag walls to protect the tracks around Quinn's, and to dig a sap trench to advance the Allied firing line.
[45][46] Transported aboard several destroyers and barges from Anzac Cove south to Cape Helles, the detached New Zealanders were temporarily organised into an ad hoc composite division with the Australians and a naval brigade for the coming attack.
[47] On 7 May, ammunition and entrenching tools were issued before the New Zealanders began moving up towards Gully Beach, in the Gulf of Saros, on the Aegean side of the cape.
Coming under heavy machine gun and rifle fire from Ottoman defenders in the Gully Ravine,[49] the attack was halted after only 400 yards (370 m) and the New Zealanders were forced to dig in by 3:00 pm.
The New Zealanders, on the left of the Australians, joined the attack, with the Auckland and Otago Battalions charging forward, alongside the British 88th Brigade, and clearing an Ottoman trench line with bayonets fixed.
[52] The main attack petered out after about two hours,[53] having gained another 330 yards (300 m), although the Canterbury Battalion worked throughout the evening to link up with the Australian 2nd Brigade.
[56] Several days were then spent in camp around the Krithia road until the evening of 19 May when the brigade embarked to return to Anzac Cove, where an Ottoman counter-attack had begun.
[61] To make up for the deficiencies caused by the detachment to Krithia, and the losses from disease and combat,[62] in mid-May 1915, Australian and New Zealand mounted soldiers began arriving at Gallipoli as reinforcements.
The defensive fighting during this period was the first major action fought by the newly arrived New Zealand Mounted Rifles Brigade who occupied a position around Walker's Ridge.
Throughout June, while the Third Battle of Krithia raged around Helles, operations around Anzac focused mainly on improving the positions around the Allied line, although there were several small scale skirmishes with both sides sniping at each other and making grenade attacks.
To provide cover to assaulting troops moving from the beachhead to the outposts in the northern sector of the perimeter, the communication trench was widened by the Australians and New Zealanders throughout July.
[84] Meanwhile, another landing would be made by predominately British forces at Suvla Bay, to the north of Anzac Cove, under the command of Lieutenant General Frederick Stopford.
Hampered by poor maps and inadequate knowledge of the ground over which the assault was to take place, the 4th Brigade briefly became lost during the approach.
The following day, the 4th Brigade drove towards the Abdel Rahman spur line, where they came under heavy machine gun fire which halted their advance.
[89] Meanwhile, the drive on Chunuk Bair by the New Zealand Infantry Brigade, spearheaded by the Aucklanders made better progress, but was stopped short of the summit.
A renewed attack was made on 8 August by the Wellington Battalion, during which the New Zealanders pushed forward from the Pinnacle and up Rhododendron Ridge to capture the summit.
As the offensive failed elsewhere, the Ottomans poured reinforcements against Chunuk Bair, subjecting the New Zealanders and British troops there to several determined counter-attacks.
[91] Elsewhere, while the majority of the division was focused on Chunuk Bair, Brigadier General Frederic Hughes' 3rd Light Horse Brigade – allocated as corps troops at Anzac,[92] but assigned to Godley for the offensive[86] – undertook a costly attack towards Baby 700 and the Nek.