6th Division (Australia)
[3] The division was not re-raised during the interwar years and subsequently remained off the Australian Army's order of battle until World War II broke out.
Due to the provisions of the Defence Act, which precluded the five existing Militia divisions from serving overseas, the government decided to raise an all-volunteer force known as the 2nd AIF.
Initially under the command of Lieutenant General Thomas Blamey, upon formation the division consisted of the 16th, 17th and 18th Brigades, each established with four infantry battalions.
After being partially broken up to provide personnel to serve as infantry in the 25th Brigade, once the threat of invasion was over these two regiments were sent to the Middle East to rejoin the division, arriving there in December 1940.
[9] In September 1940, the Italian Tenth Army invaded Egypt,[10] a British colony, threatening Allied control of the Middle East and most particularly, the Suez Canal and international supply routes.
[11] British forces under General Sir Archibald Wavell expelled the Italians from Sidi Barrani and pursued them back towards the Libyan border.
[13] On 3 January 1941, at Bardia, a small coastal town just inside the Libyan border, the first major Australian action of World War II took place.
[14][15] Amidst a heavy artillery barrage and supported by British Matilda tanks and Bren carriers of the divisional cavalry,[4] the 6th Division penetrated the defences of the Italian stronghold.
[18] During January and February 1941, the 6th Division, together with British units, pushed the Italian army back across Libya, including actions at Derna, Barce and Benghazi.
[23] Hitler was concerned that if Greece—which since 28 October 1940 was fighting against the Italians in Albania—became a British ally then the Ploesti oilfields in Romania, on which Germany relied for her fuel, might be open to air attack from Greece.
[24] In March 1941, Prime Minister Robert Menzies, of Australia, with the concurrence of his Cabinet, agreed to the sending of Australian troops to Greece to defend against a German attack.
[31] They had both lost all of their equipment in Greece and as a result the 2/2nd were thrown into the line as infantry,[31] while the 2/3rd were hastily re-equipped with 14 captured French and Italian artillery pieces.
[35] Following the evacuation of Crete, while the 6th Division began rebuilding in Palestine,[36] the cavalry was allocated to take part in the bloody but successful attack on Vichy French forces in the Syria-Lebanon campaign.
[49] The campaign to that point had consisted of a series of battles fought along the track after the Japanese had landed around Buna and pushed south towards Port Moresby, but were checked at Ioribaiwa.
[51][52] As the Japanese, having reached the extent of their supply lines, began to withdraw from Ioribaiwa, the Australians went on the offensive, pursuing them back north towards Buna.
Gorari was taken and by mid-November the brigade, having suffered 471 battle casualties since the being committed to the fighting around Kokoda, finally reached Wairopi, where the swollen Kumusi River was forded.
[57] After crossing the Kumusi, the 16th Brigade was ordered to move towards Sanananda Point to support the joint Australian–US effort to attack the Japanese beachheads around the Buna–Gona area.
[58] The ration situation had grown worse by this time, and progress was slow as the march proved too difficult for many of the soldiers in their weakened physical states.
[60] On 23 November, the 16th Brigade finally received artillery support, after a battery from the 2/1st Field Regiment was flown into the hastily established airfield at Popondetta and began firing upon Sananada.
With crews drawn mainly from the 2/7th Infantry Battalion and one from the 2/5th, they were thrown into action around Buna on 5 December to support a major assault and, despite making some headway against the heavily entrenched Japanese, were wiped out with heavy casualties.
[64] Shortly after the Japanese landings around Salamaua and Lae in March 1942 a small band of commandos known as "Kanga Force" had established themselves around Wau and in May commenced a seven-month guerilla campaign in the area.
[65] In early January 1943, the Japanese heavily reinforced the Salamaua–Lae area, moving 4,000 troops from both Guadalcanal and Papua where they had suffered setbacks, in the hope of destroying Kanga Force, capturing the Wau, which lay in the strategically important Bulolo Valley, which offered the Allies an airstrip that could serve as a "potential springboard"[64] that could be used to move large concentrations of troops over the Owen Stanley Range to attack the Japanese bases at Salamaua and Lae.
[70] Throughout the day the company fought desperately to hold the Japanese while reinforcements from the 2/5th were brought up from Wau; in the mid-afternoon, as it looked like they would be overrun, a desperate bayonet charge temporarily bought the Australians some relief and they eventually withdrew about a mile to the south-west,[71] back towards the Bulolo River where they formed a night defensive position, having successfully delayed the Japanese advance and inflicted over 75 killed upon them.
Throughout the following day, as poor weather hampered efforts to fly in the 2/7th Infantry Battalion, a large group of about 500 Japanese bypassed 'A' Company's position and continued on towards Wau.
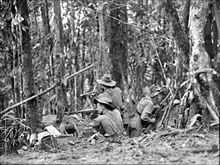
[81] Moving over steep, muddy ridges amidst dense, fetid jungle terrain the 2/7th found the going tough and by late May the 2/6th took over the drive towards Nassau Bay.
[84] In early July, the 2/7th attacked Observation Hill and as the Japanese began to withdraw from Mubo, the 2/5th was sent north to act in support of the newly arrived Militia 15th Brigade, which was moving on Bobdubi Ridge.
[86] A path was eventually found and after securing Laver's Knoll, the Australians began working around behind Mount Tambu, towards the northern end of Bobdubi Ridge.
[93] Isolated pockets of Japanese offered significant resistance in places, which had to be overcome with artillery, air and tank support, while daily patrols risked ambush and attacks from snipers.
[103] The second went to Private Edward Kenna, of the 2/4th Infantry Battalion, for destroying several Japanese bunkers that were holding up his company's advance around the Wirui Mission.
[105] On 13 September, the division took the formal surrender of the XVII Army's commander, Lieutenant General Hatazō Adachi, at Cape Wom airstrip.