Second Battle of the Jordan
The first area was the Jordan Valley between Jisr ed Damieh and Umm esh Shert, where the Egyptian Expeditionary Force (EEF) defended their advanced position against an attack by units of the Seventh Army based in the Nablus region of the Judean Hills.
The third area of fighting occurred after Es Salt was captured by the light horse brigades to the east of the valley in the hills of Moab, when they were strongly counterattacked by Ottoman forces converging on the town from both Amman and Nablus.
Just a few weeks later at the end of April, the Desert Mounted Corps again supported by the 60th (London) Division were ordered to attack the recently entrenched German and Ottoman garrisons at Shunet Nimrin and advance to Es Salt with a view to capturing Amman.
By the fourth day of battle, the strength and determination of the entrenched German and Ottoman defenders at Shunet Nimrin, combined with the strength of attacks in the valley and from Amman in the hills, threatened the capture of one mounted yeomanry and five light horse brigades in the hills, defending Es Salt and attacking the rear of the Shunet Nimrin position, forcing a retreat back to the Jordan Valley.The German and Ottoman forces won victories at the first and second battles of Gaza in March and April 1917.
But from the last day of October 1917 to the end of the year, the German, Austrian and Ottoman Empires endured a series of humiliating defeats in the Levant, culminating in the loss of Jerusalem and a large part of southern Palestine to the Egyptian Expeditionary Force (EEF).
[26][27][28][29] During the first Transjordan attack on Amman, the high country had still been in the grip of the wintry wet season, which badly degraded roads and tracks in the area, making the movements of large military units extremely difficult.
The Beni Sakhr offer to join the Hejaz Arabs was also enticing because these two groups together might be able to hold Es Salt and Shunet Nimrin permanently, making it unnecessary for Allenby's force to garrison the Jordan Valley over the summer period.
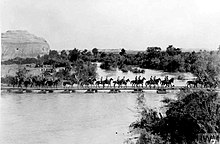
Tough, efficient, splendidly equipped, battle-hardened, well led and well trained soldiers, a magnificent body of men and horses.The Australian Mounted Division crossed the Jordan River at Ghoraniyeh on a pontoon bridge just wide enough for one vehicle or two horses abreast.
[74] These appear to have been completely successful as despite the size of the force, Liman von Sanders claims, "so secretly and ably had their [British Empire] preparations been carried out that even the most important were hidden from our aviators and from ground observation".
[76][77] Here at Shunet Nimrin opposite the Ghoraniyeh bridgehead and crossing, the Ottoman Fourth Army's VIII Corps was strongly entrenched in positions, which controlled the main sealed road from Jericho to Es Salt and Amman and the Wadi Arseniyat (Abu Turra) track.
Before dawn the 180th Brigade on the right made three attempts to gain two narrow paths but was fired on by machine guns and failed to reach their objective; the 2/20th Battalion, London Regiment managed to decisively defeat a reserve company killing 40 German or Ottoman soldiers and capturing 100 prisoners.
[94][95][96] The 4th Light Horse Brigade initially took up a line 8 miles (13 km) long with both flanks exposed facing north-west about 2,000 yards (1,800 m) west of the foothills covering the Jisr el Damieh to Es Salt track.
[61][89][94] About midday, the 1st Light Horse Regiment captured Red Hill and took over the prominent position after some intense fighting while its former German and Ottoman garrison retired across the Jordan to where there were already greatly superior enemy reinforcements.
[88][Note 19] The 5th Mounted Field Ambulance followed its brigade up the Umm esh Shert track leaving both vehicles and camels at the foot of the hills 2 miles (3.2 km) east of the divisional collecting station.
[99][125][126][Note 21] This strong Ottoman force advanced from the broken ground east of the Jordan, in open order with their right flank directed on the gap between the left of the 4th Light Horse Brigade and Red Hill.
Cavalry, transport, infantry, were gathering from the Jordan bridge, towards a concentration point a few miles to the North of Red Hill ... Only a few minutes were necessary to convince the Major that unless an immediate withdrawal was made, the position would be surrounded, and he ordered the squadron to contact at once the led horses, then safely hidden behind a high ridge in the rear.
[121][123][142] The German and Ottoman advance was stopped about 1 mile (1.6 km) north of Um esh Shert and covering the only track still open from the Jordan Valley to the light horse and mounted brigades on the mountains at Es Salt.
At 14:45 the Canterbury Mounted Rifles Regiment and the 11th Light Armoured Motor Battery [LAMB], were withdrawn from the 60th (London) Division's infantry still fighting the Ottoman garrison at Shunet Nimrin, to reinforce Chaytor's force.
[155] The German and Ottoman reinforcements which had advanced from Beisan and Nablus over the Jordan River at Jisr ed Damieh began strongly attacking the 3rd Light Horse Brigade at Es Salt from the north and northwest.
[dubious – discuss] After repulsing the attackers twice with the bayonet the light horsemen were forced to withdraw losing access to a good spring but the loss of Table Top did not compromise the integrity the Umm esh Shert line.
But the Ottoman VIII Corps continued to present a strong front while their Austrian gunners, having fired away all their ammunition took their rifles and joined the detachment protecting the rear of El Haud and Shunet Nimrin.
Tooth's Detachment consisting of one squadron 6th Light Horse Regiment, two companies Patiala Infantry and the 16th Mountain Battery, had early successes in their advance up the Wadi Abu Turra to attack El Haud.
[169][176] The situation was cleared by Major Shannon, commanding the 8th Light Horse Regiment, when he dispatched a troop of 25 men to work round the German and Ottoman right flank, if possible unseen by the enemy, and charge them from the rear.
Beyond the gorge another light horse regiment was holding the flank; the troop got in touch with the post on their right before dark and it was estimated that they were responsible for roughly 300 yards (270 m) of the outpost line, with orders not to withdraw until definite word from headquarters.
After a great deal of equipment was abandoned, all but two mortally wounded men were finally mounted on to the camel cacolets of the 3rd Light Horse Field Ambulance and under heavy but wild rifle fire from the townspeople of Es Salt, left at 19:30 on a perilous 20-mile (32 km) descent of the Umm esh Shert track.
At the same time enemy guns heavily shelled the light horse rearguard and several German and Ottoman aircraft caused a number of casualties when they bombed the retiring columns as they moved down the narrow, steep-sided gorge.
[184] The dead infantrymen from the 60th (London) Division were removed in wagons for burial; it is not known what happened to the bodies of Australian light horsemen, British mounted yeomanry and New Zealand riflemen who died while fighting around Es Salt and in the Jordan Valley.
And during the five weeks between the first and second Transjordan operations they demonstrated a substantial measure of recovery at Tulkarem, offensive tendencies in the upper Jordan Valley, and had created a strong defensive position at Shunet Nimrin which withstood all attacks.
As a result, the whole of the Ottoman 4th Army was employed in monitoring and harassing the Occupation of the Jordan Valley (1918) by the Egyptian Expeditionary Force leaving the extreme right of their line comparatively weak and giving Allenby an opportunity to attack on the coast of the Mediterranean in mid-September 1918.
The Ottoman attack on 1 May quickly overwhelmed the 4th Light Horse Brigade and that it managed to withdraw in as good an order as it did, in confused and dangerous circumstances, is testimony to the experience of the troops and the quality of the junior, squadron and regimental leadership.